In this issue:
- Introduction to Cause and Effect Diagrams
- Cause and Effect Diagrams Organize
- Creating a Cause and Effect Diagram
- The 5 Whys
- Summary
- Quick Links
What causes variation in things we do? Why don’t we arrive at work at the same time every day? Why isn’t the monthly report error-free each month? Why can’t we produce the same product day in and day out? The cause and effect diagram is a good tool to use to summarize the causes of variation in our process and to begin the search for root causes. This publication introduces the cause and effect diagram. Next month we will look at how you analyze a cause and effect diagram.
Introduction to Cause and Effect Diagrams
Creating a cause and effect diagram is fun and educational. These diagrams are usually constructed as a team or group activity to get ideas from as many people as possible. As a result of everyone working on the diagram together, everyone tends to gain some new knowledge. Cause and effect diagrams encourage new ideas about causes of problems by helping the group think about different categories of causes. The cause and effect diagram also indicates how much we know about our process. If the diagram is full, we know a lot about our process. If it is sketchy, chances are we don’t have a good understanding of our process. Cause and effect diagrams should be living documents. That is, we should actively seek causes of problems and add to the diagram as time goes on.
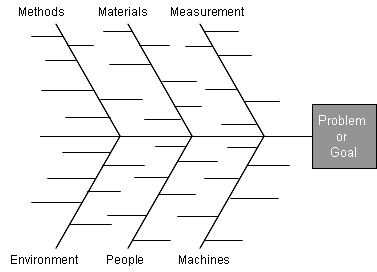
A cause and effect diagram is a tool that shows the relationship between an effect and possible sources of variation for this effect (causes). As shown in the figure the effect could be a problem that needs to be solved. The causes of the problem would then be listed on the cause and effect diagram. The effect could also be a goal. In this case, what needs to be done to reach the goal would be listed on the cause and effect diagram.
The causes are most commonly categorized as machines, methods, environment, materials, measurement, and people (the 4 M’s, a P and an E). This is particularly true for manufacturing applications. You can pick your own categories.
Cause and effect diagrams are also called fishbone diagrams (because of their appearance) and Ishikawa diagrams (because of their developer). Cause and effect diagrams can be used for any problem in any department (manufacturing, administration, controllers, supply and transportation, marketing, etc.).
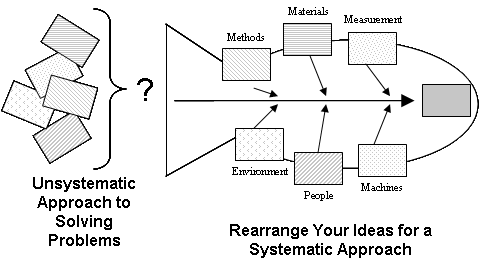
The cause and effect diagram is one of many root cause analysis tools. Root cause analysis should be thorough enough to “root” out the deep and hidden causes that are often missed with quick fixes to problems. It provides a method of taking all the jumbled-up ideas we have and arranging them so we can use a systematic approach to improvement.
Cause and Effect Diagrams Organize
Creating a Cause and Effect Diagram
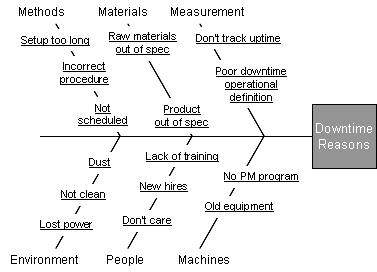
An example of a cause and effect diagram on reasons for downtime is shown in the figure above. The steps to create this diagram are given below.
1. Pinpoint the problem you want to fix or the goal you want to reach.
2. Write the problem or goal (effect) on the right hand side of a large sheet of paper taped to the wall and draw a horizontal line to the left.
3. Select the categories for the causes of the problem or for what needs to be done to reach the goal. These categories will be the main factors of the cause and effect diagram. Each main factor forms a branch off the horizontal line.
4. Brainstorm detailed causes for each main factor. These detailed causes are written on branches off those of the main factors. Use the brainstorming rules shown below to maximize the number of causes your group develops.
- Go for quantity of ideas.
- Everyone participates.
- Encourage creativity.
- Don’t discuss/criticize/evaluate ideas.
- Build off other ideas.
- Pass if you don’t have an idea to contribute.
5. Always try to branch further by continuously asking, “What causes variation in this branch?” In this way, you can add to the cause and effect diagram until it fully shows all the possible causes of variation.
A summary of the general rules for constructing a cause and effect diagram is given below.
- Get everyone to participate.
- Don’t forget that this is a brainstorming session; brainstorming rules apply.
- Give ideas one at a time to encourage creative ideas.
- Have the person giving the idea tell which “bone” of the fish the idea goes on. For example, say “My idea is the truck tire pressure. That goes on the Materials bone.”
- Allow any idea to go on more than one bone. Allow other team members to use the same idea on multiple bones.
- Never analyze or criticize suggestions while creating the fishbone. This includes nonverbal criticism such as shaking your head or drawing back from the group.
- Piggyback one suggestion into another, let ideas suggest other ideas.
- Use the major bones to help you come up with ideas. For example, think to yourself, “How could our methods or procedures cause this problem?”
- Ask yourself for each idea that has already been given, “Why does that happen? How does that happen?” to develop branches or “smaller bones” off each major bone.
- Be open and honest. Have the courage to give the idea that everyone is thinking about, but doesn’t want to state.
- Never use the suggestion that someone came up with in a fishbone session against the person outside the meeting. For example, never leave the meeting saying, “You’ll never guess what Sam thought the problem was…He thinks that it’s all Harvey’s fault!”
The 5 Whys
Another useful tool to use in conjunction with cause and effect diagrams is called the 5 Whys. This technique involves asking “Why?” five times to help get to the root cause. An example of the 5 Whys is given below.
- Why are you throwing sawdust on the floor?
- Because the floor is slippery and wet.
- Why is it slippery and unsafe?
- Because there is oil on it.
- Why is there oil on it?
- Because the machine is dripping.
- Why is the machine dripping?
- Because oil is leaking from the oil coupling.
- Why is it leaking?
- Because the rubber lining inside the coupling is worn out.
The process of continually asking “why?” helps drill down to the root cause. It also helps fill out the branches on a cause and effect diagram.
Summary
This publication introduced how to create a cause and effect (fishbone) diagram. The fishbone diagram was explained and an example using downtime was presented. The steps in creating the fishbone diagram were covered. The 5 Whys were introduced as another technique to find causes to add to the fishbone.