February 2020
(Note: all the previous SPC Knowledge Base in the control charts basics category are listed on the right-hand side. Select this link for information on the SPC for Excel software.)

There is just one problem. This wonderfully, consistent process produces out of specification material sometimes. How do you handle this out of specification material? There are two common things that people try. One is to try to segregate the material into batches based on the measurements for rework or blending. The other is to adjust the process to compensate for the out of specification product. This publication shows why these two things do not work.
The reality is that your customer is going to receive material from the lower control limit to the upper control limit, regardless of what you do. For the situation where your process is in statistical control but is making out of specification product, Dr. Donald Wheeler said the following:
“So until you figure out how to reduce the process variation, and as long as the production process remains unchanged, the only rational action is to ship everything”
Imagine that – shipping out of specification product to a customer. You have the courage to do that? In this situation, you are already doing it!
In this Issue:
- Our Process
- Process Control Charts
- Process Capability Chart
- Two Options to Address the Out of Specification Material
- Conclusions
- Quick Links
The information in this publication is adapted from Dr. Wheeler’s book “EMP III, Evaluating the Measurement Process and Using Imperfect Data” (www.spcpress.com). This book should be part of your library.
Please feel free to leave a comment at the end of this publication. You can also download a copy of this publication at this link.
Our Process
Our process is a continuous process. A sample is taken every hour and tested for a key quality characteristic, X. The best way to begin to understand what is happening in any process is to create a control chart based on the results. The data for the last 100 hours are shown in Table 1 below. The specifications for our process are 87 to 91 with a process aim of 89.
Table 1: Hourly Process Data
| Sample | X | Sample | X | Sample | X | Sample | X |
|---|---|---|---|---|---|---|---|
| 1 | 90 | 26 | 88 | 51 | 86 | 76 | 88 |
| 2 | 86 | 27 | 91 | 52 | 88 | 77 | 87 |
| 3 | 92 | 28 | 89 | 53 | 88 | 78 | 88 |
| 4 | 90 | 29 | 88 | 54 | 92 | 79 | 88 |
| 5 | 89 | 30 | 91 | 55 | 86 | 80 | 91 |
| 6 | 90 | 31 | 90 | 56 | 88 | 81 | 89 |
| 7 | 89 | 32 | 91 | 57 | 89 | 82 | 85 |
| 8 | 88 | 33 | 90 | 58 | 92 | 83 | 88 |
| 9 | 91 | 34 | 90 | 59 | 90 | 84 | 90 |
| 10 | 90 | 35 | 87 | 60 | 88 | 85 | 89 |
| 11 | 84 | 36 | 91 | 61 | 91 | 86 | 86 |
| 12 | 89 | 37 | 90 | 62 | 92 | 87 | 89 |
| 13 | 87 | 38 | 87 | 63 | 89 | 88 | 94 |
| 14 | 90 | 39 | 89 | 64 | 89 | 89 | 91 |
| 15 | 87 | 40 | 88 | 65 | 90 | 90 | 88 |
| 16 | 89 | 41 | 88 | 66 | 89 | 91 | 87 |
| 17 | 88 | 42 | 91 | 67 | 92 | 92 | 88 |
| 18 | 87 | 43 | 91 | 68 | 90 | 93 | 91 |
| 19 | 91 | 44 | 89 | 69 | 91 | 94 | 89 |
| 20 | 90 | 45 | 90 | 70 | 87 | 95 | 86 |
| 21 | 91 | 46 | 88 | 71 | 88 | 96 | 92 |
| 22 | 92 | 47 | 89 | 72 | 88 | 97 | 88 |
| 23 | 92 | 48 | 91 | 73 | 90 | 98 | 87 |
| 24 | 88 | 49 | 87 | 74 | 89 | 99 | 89 |
| 25 | 87 | 50 | 87 | 75 | 90 | 100 | 89 |
Process Control Charts
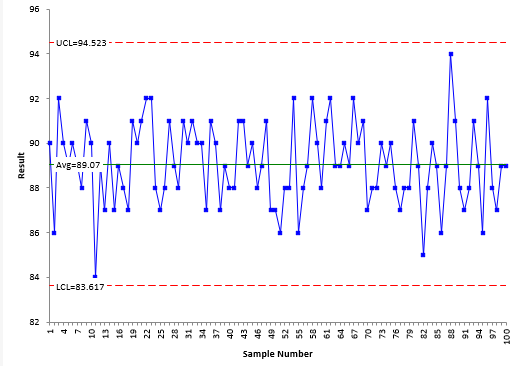
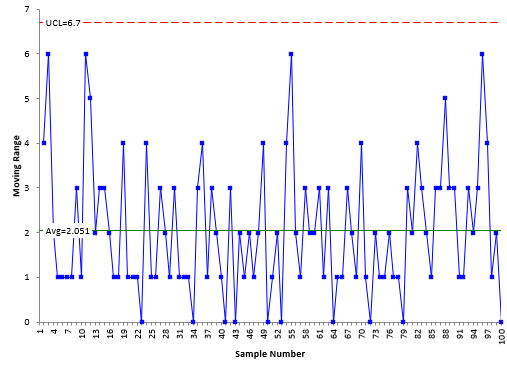
The data in Table 1 can be analyzed using an individuals (X-mR) control chart. The X chart is shown in Figure 1. The moving range chart is shown in Figure 2. What do these two charts tell you about the process?
Figure 1: X Control Chart for Process Data
Figure 2: mR Control Chart for Process Data
Both charts are in statistical control. There are no special causes of variation. This means that we can use the past, as defined by the control limits, to predict what will happen in the future. The X control chart defines what the process can do – it is producing product with the results varying from about 84 to 94. This is what we should expect the process to do in the future.
If a point falls beyond the control limits, a special cause of variation is present. The reason for this should be found and eliminated. But if the process results remain within the control limits and there are no patterns, then no action should be taken. The process is operating the best it can.
No action? But what about those specifications? What about the customer? A control chart represents the voice of the process – the range of what the process produces. Interesting thing about a process – it doesn’t care what your specifications are or what your customer wants. It just produces what you designed the process to make – and how you manage that on a day-to-day basis. But customers do care what you send them.
Process Capability Chart
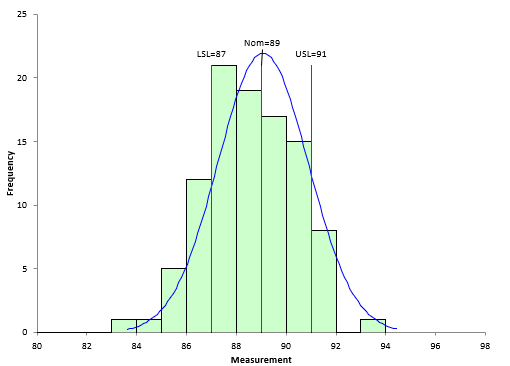
The specifications for the process are 87 to 91 with a process aim of 89. These specifications represent the “voice of the customer.” The average from the X chart is 89.07, so the process is operating at the process aim. But all is not well. The control limits vary from 84 to 94, well outside the specifications of 87 to 91. This indicates that the process is not meeting specifications.
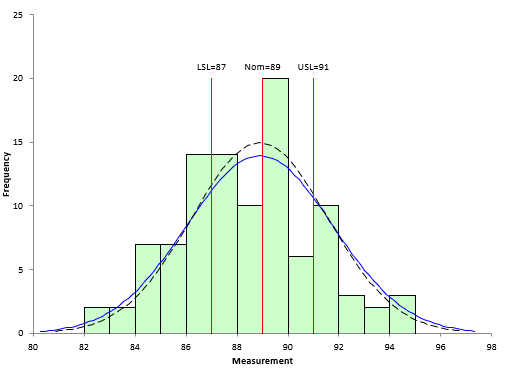
The process capability chart for the data in Table 1 is shown below in Figure 3.
Figure 3: Capability Analysis for Process Data
It is easy to see from this chart that there are data outside the specification limits. The Cpk value for the process is 0.37, well below 1.0. 16 out of the 100 data points are out of specifications.
We have a problem. We have a process that is operating the best it can. It is consistent and predictable. But we have 16 data points that are out of specification. What can we do?
Two Options to Address the Out of Specifications Material
There are a variety of things that people try to handle the out of specification material. Two of these include:
- Using measurements to quantify batches
- Using measurements to adjust the process
Unfortunately, neither of these work. Let’s explore why.
A common, but not good, approach is to use the measurements to help define “production batches.” With this example, it may be assumed that each hour represents a “batch” of material. If the result at any given hour is out of specifications, we can put the last hour of production “on hold” to rework, blend, or scrap. Sounds like a good approach, correct?
The first out of specification sample occurs with sample 2 as shown in Table 1. The value for sample 2 is 86, below the LSL of 87. The last hour of production is put “on hold.” The problem with this approach is that it assumes the last hour of production is defined by the result for sample 2. Why do we believe this sample result applies to all production for the last hour? It does not.
Look back at the X chart in Figure 1. It represents the variation in the process based on hourly samples. It is consistent and predictable. Is there any reason to believe the variation within each hour is different from Figure 1? There is not any reason to believe this. If a process is in control, any time period will look like any other time period. So, within each hour, we would expect the results to vary from 84 to 94, just like it is shown in Figure 1.
Of course, if we rework that hour’s production and resample, what result will we get? We don’t know for sure, but it will be between 84 and 94 – a good possibility that will be within specification. This just reinforces us doing the wrong thing.
Another common method is to adjust the process to try to “compensate” for the out of specification product. In this case, you adjust the process aim whenever the process produces a result that is out of specification. If the result is below the LSL, then the process aim is adjusted upward. If the result is above the USL, then the process aim is adjusted downward. Sample 2 had a result of 86, below the LSL. It is 3 below the process aim of 89, so the process aim is adjusted upward by 3. The adjustments accumulate over time. The results using this approach are shown in Table 2.
Table 2: Adjusted Process Results
| Sample | X | Adj. | Cumulative Adj. | Adj. X | Sample | X | Adj. | Cumulative Adj. | Adj. X |
|---|---|---|---|---|---|---|---|---|---|
| 1 | 90 | 0 | 0 | 90 | 51 | 86 | 0 | 2 | 88 |
| 2 | 86 | 3 | 3 | 86 | 52 | 88 | 0 | 2 | 90 |
| 3 | 92 | -6 | -3 | 95 | 53 | 88 | 0 | 2 | 90 |
| 4 | 90 | 0 | -3 | 87 | 54 | 92 | -5 | -3 | 94 |
| 5 | 89 | 3 | 0 | 86 | 55 | 86 | 6 | 3 | 83 |
| 6 | 90 | 0 | 0 | 90 | 56 | 88 | 0 | 3 | 91 |
| 7 | 89 | 0 | 0 | 89 | 57 | 89 | -3 | 0 | 92 |
| 8 | 88 | 0 | 0 | 88 | 58 | 92 | -3 | -3 | 92 |
| 9 | 91 | 0 | 0 | 91 | 59 | 90 | 0 | -3 | 87 |
| 10 | 90 | 0 | 0 | 90 | 60 | 88 | 4 | 1 | 85 |
| 11 | 84 | 5 | 5 | 84 | 61 | 91 | -3 | -2 | 92 |
| 12 | 89 | -5 | 0 | 94 | 62 | 92 | 0 | -2 | 90 |
| 13 | 87 | 0 | 0 | 87 | 63 | 89 | 0 | -2 | 87 |
| 14 | 90 | 0 | 0 | 90 | 64 | 89 | 0 | -2 | 87 |
| 15 | 87 | 0 | 0 | 87 | 65 | 90 | 0 | -2 | 88 |
| 16 | 89 | 0 | 0 | 89 | 66 | 89 | 0 | -2 | 87 |
| 17 | 88 | 0 | 0 | 88 | 67 | 92 | 0 | -2 | 90 |
| 18 | 87 | 0 | 0 | 87 | 68 | 90 | 0 | -2 | 88 |
| 19 | 91 | 0 | 0 | 91 | 69 | 91 | 0 | -2 | 89 |
| 20 | 90 | 0 | 0 | 90 | 70 | 87 | 4 | 2 | 85 |
| 21 | 91 | 0 | 0 | 91 | 71 | 88 | 0 | 2 | 90 |
| 22 | 92 | -3 | -3 | 92 | 72 | 88 | 0 | 2 | 90 |
| 23 | 92 | 0 | -3 | 89 | 73 | 90 | -3 | -1 | 92 |
| 24 | 88 | 4 | 1 | 85 | 74 | 89 | 0 | -1 | 88 |
| 25 | 87 | 0 | 1 | 88 | 75 | 90 | 0 | -1 | 89 |
| 26 | 88 | 0 | 1 | 89 | 76 | 88 | 0 | -1 | 87 |
| 27 | 91 | -3 | -2 | 92 | 77 | 87 | 3 | 2 | 86 |
| 28 | 89 | 0 | -2 | 87 | 78 | 88 | 0 | 2 | 90 |
| 29 | 88 | 3 | 1 | 86 | 79 | 88 | 0 | 2 | 90 |
| 30 | 91 | -3 | -2 | 92 | 80 | 91 | -4 | -2 | 93 |
| 31 | 90 | 0 | -2 | 88 | 81 | 89 | 0 | -2 | 87 |
| 32 | 91 | 0 | -2 | 89 | 82 | 85 | 6 | 4 | 83 |
| 33 | 90 | 0 | -2 | 88 | 83 | 88 | -3 | 1 | 92 |
| 34 | 90 | 0 | -2 | 88 | 84 | 90 | 0 | 1 | 91 |
| 35 | 87 | 4 | 2 | 85 | 85 | 89 | 0 | 1 | 90 |
| 36 | 91 | -4 | -2 | 93 | 86 | 86 | 0 | 1 | 87 |
| 37 | 90 | 0 | -2 | 88 | 87 | 89 | 0 | 1 | 90 |
| 38 | 87 | 4 | 2 | 85 | 88 | 94 | -6 | -5 | 95 |
| 39 | 89 | 0 | 2 | 91 | 89 | 91 | 3 | -2 | 86 |
| 40 | 88 | 0 | 2 | 90 | 90 | 88 | 3 | 1 | 86 |
| 41 | 88 | 0 | 2 | 90 | 91 | 87 | 0 | 1 | 88 |
| 42 | 91 | -4 | -2 | 93 | 92 | 88 | 0 | 1 | 89 |
| 43 | 91 | 0 | -2 | 89 | 93 | 91 | -3 | -2 | 92 |
| 44 | 89 | 0 | -2 | 87 | 94 | 89 | 0 | -2 | 87 |
| 45 | 90 | 0 | -2 | 88 | 95 | 86 | 5 | 3 | 84 |
| 46 | 88 | 3 | 1 | 86 | 96 | 92 | -6 | -3 | 95 |
| 47 | 89 | 0 | 1 | 90 | 97 | 88 | 4 | 1 | 85 |
| 48 | 91 | -3 | -2 | 92 | 98 | 87 | 0 | 1 | 88 |
| 49 | 87 | 4 | 2 | 85 | 99 | 89 | 0 | 1 | 90 |
| 50 | 87 | 0 | 2 | 89 | 100 | 89 | 0 | 1 | 90 |
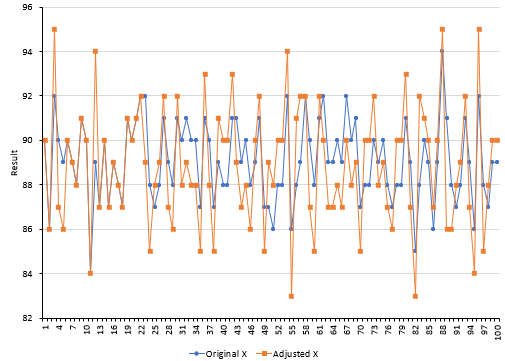
Did this help us any? Dr. W. Edwards Deming warned us about adjusting a process that is in statistical control. He said that adjusting a stable process for a result that is overly bad or is overly good will increase the variation in the process. Figure 4 compares the original X values with the adjusted X values.
Figure 4: Original X Values vs Adjusted X Values
It is easy to see from Figure 4 that Dr. Deming was correct. There is more variation in the adjusted X values than the original X values. This is called overcontrolling the process. The funnel experiment is a great way to demonstrate overcontrol. Please see our SPC Knowledge Base article Over-Controlling a Process: The Funnel Experiment for more information.
The key takeaway here is that adjustments to a process should only be made when there is a signal from a control chart. Otherwise, you increase variation and your costs by overcontrolling the process. Figure 5 is the process capability chart for the adjusted values.
Figure 5: Process Capability Chart for Adjusted X Values
Compare Figure 5 to Figure 3. You will see that there is more spread with the adjusted X values than with the original X values. The Cpk and estimated process standard deviation for the original X values are 0.35 and 1.818 respectively, while they are 0.23 and 2.866 for the adjusted X values.
Adjusting the process in an attempt to correct for the out of specification material does not help – it only makes matters worse. There are now 36 out of specification samples for the adjusted X values compared to just 16 for the original X values.
Conclusions
What do you do about in control but out of specification? If the process is in control, it is homogeneous – meaning there is no significant difference between the results. The material from 84 to 94 is essentially the same.
Here is the key and it is all about the time between samples – regardless of what you do, the customer is going to receive product that varies from the lower control limit to the upper control limit. There is nothing you can do about that for the current process. Dr. Wheeler was very clear about what to do in this situation:
“So until you figure out how to reduce the process variation, and as long as the production process remains unchanged, the only rational action is to ship everything.“
Your focus should be on reducing the process variation. Using the approaches above focus you on the product – which has already been made.
One final quote from Dr. Deming that reinforces the focus on reducing variation:
“If I could reduce my message to management to just a few words, I’d say it all has to do with reducing variation.”
Thanks,Great article! The second case is exactly what all lathe operators do without understanding the nature of variability. How can they know that? First of all, business management should know about this “problem”, which can be a huge opportunity.With respect, Sergey Grigoriev
I would like to suggest to build on this example and ask you how would you proceed and what would you consider doing when a given result is out-of specification and you wish to confirm that it is either a real OOS or just a measurement outlier.This is a situation common in a pharmaceutical manufacturing process where an OOS result of a tested batch is obtained upon testing a pharmaceutical product and one carries out an investigation to validate or invalidate a given OOS. Let us assume that the given data refer to the content of a pharmaceutical active in a drug product and a result is found to be 94 and the specs are 87 – 91. The process is supposed to be stable and not with so many OOS as in the given example. What would you do? Re-test? How many times? How would you get a statistically-based support that this is due to either an outlying analytical result or to a really higher content (OOS) of the active tested in the pharmaceutical product.
You want to be sure that the test result is valid. You do that by running a standard or control on a regular basis in the test method. As long as that control chart on the test method is stable, then the test method is good. Of course, it is possible that there was an issue on the one test that produced the 94. But if the test method is in control with respect toe standard or control, i would assume it is really due to the higher content.