November 2017
(Note: all the previous SPC Knowledge Base in the measurement systems analysis category are listed on the right-hand side. Select this link for information on the SPC for Excel software.)

Why do we take measurements? We take measurements to know where we are. Are things staying the same? Are they getting better? Are they getting worse? We take measurements to tell us if a process change has improved the process. For measurements to be effective, they must be timely, accurate, and precise. The lab’s customers, both internal and external, rely on measurements the lab provides.
So, what is the role of a lab? The role of a lab is to provide their internal and external customers with timely measurement data that are accurate and precise and meets their needs.
There are many types of test methods. Some can be very accurate and precise. However, this is not true for all types of test methods. For example, in the process industries, there are many types of test methods including on-line analyzers, wet chemical techniques and physical test methods. Some of these test methods are not very accurate or precise.
How does a lab go about ensuring that they meet the needs of their customers? This publication addresses how to setup a lab quality improvement process to accomplish this.
In this issue:
- Test Methods and Variation
- Accuracy and Precision Definitions
- 25 Questions on Starting a Lab Quality Improvement Process
- Summary
- Quick Links
Please feel free to leave a comment at the end of the publication. You can download a pdf copy of this publication at this link.
Test Methods and Variation

When a measurement is taken, it is often assumed that the measurement result is the “true” value of the sample. Unfortunately, this is not true. Test methods, like other processes, are subject to variation. You will not always get the same result, for example, when you run a sample again. The following examples illustrate two ways variation in a test method can impact a process.
Suppose you are an operator in a plant. You have started a control chart on a certain product parameter. This parameter is determined by a lab test method. Suppose the test result gives a point that is above the upper control limit. This means there is a special cause present in the process. Your responsibility is to begin looking for the cause. Where do you start? There are many sources of variation present in a process. The cause could be due, for example, to a change in raw materials or a sudden drop in the outside temperature. You begin to look for the cause. This takes time.
What about the test method? Is it possible that the special cause was due to something occurring in the test method and not in the processing unit? The answer to this is yes. It is possible that the test method did not reflect an accurate value for the product parameter. If this is the case, you will spend a lot of time looking for the special cause in the processing unit when the real cause was in the test method – in the lab. Test methods can cause special causes in the production process.
Now suppose you are an engineer. You have determined some process changes that should increase the amount of one component in a process stream. The operating unit makes the process changes, and samples are taken to the lab for analysis. Is the test method good enough to “see” the improvement caused by the process changes? If not, you will not be able to determine what impact the process changes had. Worse, you may make a wrong judgment about what impact the process changes had. A test method with a lot of variability may mask process improvements.
Accuracy and Precision Definitions
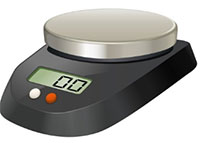
Accuracy refers to the absolute correctness of the test method relative to a standard. There are many standards. For example, one method of checking the accuracy of a lab weigh scale is to put a standard 10-gram weight on the scale. After multiple readings, the average weight should be 10 grams if the scale is accurate.
Another example involves an on-line gas analyzer. To check the accuracy of this analyzer, a standard gas is injected into the analyzer. On average, the analyzer should reflect the standard gas composition if the analyzer is accurate. Obviously, test methods should reflect the true value of a standard when the standard is tested.
Precision of a test method refers to how reproducible or repeatable the results are. How close will the results be if a standard is run multiple times? This variation in reproducing the result is called the precision of the test method. The smaller this difference, the more precise the test method.
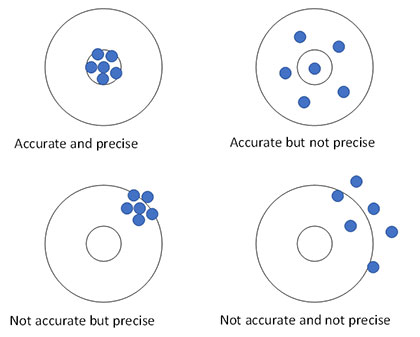
Figure 1 presents another method of developing an understanding of accuracy and precision. The objective is to hit the target’s bull’s-eye. Figure 1 shows a marksman who is precise and accurate. Each shot hits near or in the bull’s-eye (i.e., the marksman is accurate). The difference between successive shots is small (i.e., the marksman is precise). Figure 1 also shows a marksman who is accurate but not precise. If you average all his shots, the average would be close to the bull’s-eye. However, the difference between shots is very large. A marksman who is precise but not accurate is also shown in the figure. His average shot is not near the bull’s-eye. However, the difference between consecutive shots is very low. Last, Figure 1 also shows an example of a marksman who is neither accurate nor precise. There is no telling where the next shot will end up. He is off the bull’s-eye and the differences between shots are very large.
Figure 1: Accuracy and Precision
25 Questions on Starting a Lab Quality Improvement Process

But how do you go about setting this up to ensure that the accuracy and precision of test methods are known, and that the lab is focusing on continually improving test methods over time. The questions below help define the structure needed and the activities that need to take place.
For our lab here, we will assume that there is a person in charge of the lab (we will call him/her Chief Chemist) and then there are several supervisors as well. Our lab works 24/7 in 12-hour shifts. So, how do you setup a continuous improvement process in a lab? Here are the questions and answers.
1. How do you start?
To initiate the Quality Improvement Process (QIP) for a lab, the decision to begin must be made. This is the responsibility of the person in charge of the lab (e. g., Chief Chemist). Sounds simple but the top person has to make the decision that this will be done.
2. What is the next step?
The next step is to form a steering team to oversee the lab QIP. This team could be composed of the Chief Chemist and all people reporting to him/her. This is important. There needs to be a group that oversees the QIP activities in the lab. It is the support group that ensures things happen. It is best to make this part of the normal activities of the lab leadership. Hopefully, the leadership is already meeting. The QIP process simply becomes part of that meeting. You should build QIP into the normal activities of the lab.
3. What does the lab steering team do?
This team determines what the goals of the lab QIP are, determines how to achieve these goals, determines what projects (within the lab) to work on, reviews accuracy and precision results, and reviews lab control charts.
4. What are some typical lab QIP goals?
Lab QIP goals could include items such as bringing and keeping all test methods into statistical control, improving the precision of test methods, improving communication with other departments through the use of teamwork, initiating a program to monitor process raw materials, rewriting test methods, etc.
5. What are the methods for determining the precision and accuracy of test methods?
The methods for determining the accuracy and precision of test methods are covered in several our publications in the SPC Knowledge Base.
One simple method of determining the accuracy and precision of a test method is to run a standard on a regular basis. The results are analyzed using an individuals control chart (X-mR). The result each time the standard is run is plotted on the X chart. The moving range between consecutive standards run is plotted on the moving range chart. After the standard has been run 20 to 25 times, the averages and control limits for each chart can be set. The first thing to determine is whether the test method is in statistical control. If not, the reasons for the out of control points need to be found and eliminated.
If the moving range chart is in control, the standard deviation of the test method can be calculated. This is a measure of the precision of the test method. The variance of the test method is the square of that standard deviation. This includes the variance due to the various technicians running the test as well as the variance of the test method itself. This variance can then be compared to the overall process variance to determine the % of total variation that is due to the test method. This is one method of determining “how precise” a test method is – answering the question about how much of the variation we see in the product is due to the test method. You can also use Dr. Donald Wheeler’s methodology and classify the test method as a Class 1, 2, 3, or 4 monitor. Details on this approach can be found in our publication at this link.
The accuracy of the test method is determined by comparing the center line, X, on the X chart to the true value of the standard. If they are close to the same, the test method is accurate.
6. Which test methods should be monitored for accuracy and precision first?
The test methods to be monitored first should be based on what the customer’s needs are. For example, in manufacturing, the test methods to be monitored first should correspond to the variables being charted in the field. Eventually, all test methods should be monitored on a regular basis. It is best to begin monitoring as many test methods as time will allow.
7. How do we begin to monitor a test method for accuracy and precision?
The first step is to find a standard (true value is known) for the test method. Standards are often difficult to come by in some industries like the chemical industries. It may be necessary to use a lot of production material as a control. The same procedure as described above is used when running the control to determine precision. Accuracy is a little more difficult when using a control.
8. How do we know the true value of the control?
In many cases, you will not know the true value of the control. There are two things you can do. You could send samples to a series of outside labs for comparison. You would need to use statistics to see if any differences are significant. In most cases, you will have to assume that the center line, X, on the individuals chart is the true value once the test method is in control and monitor future control results against that center line.
9. Who runs the standards/controls?
The lab technicians who normally run the test also run the standards/controls. This allows you to determine the accuracy and precision of a test method under normal operating conditions.
10. When should we begin monitoring a test method?
Now!
11. Who monitors the control charts?
This depends primarily on the situation. The technician running the test should be responsible for finding why any out-of-control points occurred. Since the technician is closest to the process of running the test, he/she has the best chance of finding the reasons for out-of-control points. The person responsible for the shift should check the charts to be sure any out of control points are being examined. The chief chemist/supervisors should provide assistance by checking the charts daily.
12. How often should standards/controls be run?
This depends primarily on two things. First, it depends on how often the test is run for the customer. Second, it depends on how accurate and precise the test is. For example, if the test is run routinely for operations, the standard/control should be run once per shift. However, if the test is very precise (you have to decide what very precise means), the standard/control could be run once or twice a week to check for test stability. In the beginning, it is best to run the standards/controls once per shift.
13. When should standards/controls be run?
The standards/controls should be run at the start of a shift on a work day. This ensures you that the test is in statistical control or allows you time to find the reason for an out-of-control point.
14. What happens when you get an out-of-control point when monitoring a test method?
If this occurs, it must be a top priority to find out what caused the out-of-control situation before running any more samples. If the problem is not corrected, you do not know if the results you report to your customer are valid. The technician who ran the test has the first responsibility for finding the cause. If he/she cannot determine the cause, the technician should ask for assistance. You should treat an out-of-control test method as if the machine is broken. It needs to be fixed before you can run any more samples.
15. How does a technician look for causes of out of control situations?
The technician should make use of a control strategy which should accompany each control chart. This control strategy is an 8 – 12 step process of what to look for if an out-of-control point occurs. The last step should tell the technician what to do if he/she hasn’t found the cause. More information on control strategies is given in our publication at this link.
16. Who develops the control strategy?
The control strategy should be developed by those closest to the process, i.e. the technicians. This could be a team project.
17. Do we need to determine technician-to-technician variability?
Probably yes, but not at first. If there is too much variability in the results, one possible cause is the technician-to-technician variability. Gage R&R studies can be done to determine these differences. Information on Gage R&R studies are included in our SPC Knowledge Base.
18. If a standard is not available, how large should a control lot be?
It is best to have a large enough control lot to run 350 control samples. This corresponds to a six months’ supply if the control is run once per shift. It would be better to have a year’s supply if possible. Care should be taken to ensure that the control does not change its value over time.
19. What test do we try to improve first?
This should depend primarily on what the customer requires. One method of doing this is to do a Pareto chart on the test methods vs. percent of total process variance due to test method. The test method with the largest percent should be worked on first (could be a team project) – if it is important to the customer and run routinely.
20. How do we determine the overall process variance?
There are two methods you can use to determine overall process variance. If operations has a control chart on the variable, the overall process variance can be calculated from the average range on the range control chart if the process is in statistical control. This is the best method. If a control chart is not available, you can use a large amount (such as one month) of production data to create a control chart and estimate the overall process variance that way.
21. How do we improve the precision of a test method?
Improving the precision of a test method represents a good team project and use of a problem-solving model. Technicians who run the test should be represented on the team. An individual trained in experimental design techniques should also be on the team since these techniques can be used. But the team problem solving techniques that apply elsewhere apply for improving a test method.
22. What happens if we can’t find ways to improve the precision of a test?
If you can’t find ways to improve a test, you can ask for assistance from other departments in improving the test in or developing a new test (e.g. R&D). You may want to consider talking to other companies that run similar tests.
23. If the test method is not precise and we can’t find ways to improve it, do we still need to run the. test?
In the situation where the test method is responsible for a large portion of the process variance (e.g., 90), there is little to be gained by running the test. However, you will probably continue to do so for two reasons. One reason is that operations personnel do not like to operate their processes without test results, even if the test results are of no valid use to them. The main reason for continuing to run the test is that it may well pick up when there is a major problem in production.
24. Can we ever stop monitoring a test method?
No. Being in statistical control state is not a natural state. We must continue to monitor the test method so it stays in statistical control. If it is accurate and precise, you can reduce how often the standard/control is run.
25. How can we monitor progress with respect to test methods?
One way to monitor progress is to keep track of the percentage of test methods in statistical control. Another is to determine the % of test methods that are Class 1 monitors according to Dr. Wheeler’s definition.
Summary
This publication has looked at how a quality improvement process could be setup in a laboratory. This process is built around understanding variation and using control charts to determine the accuracy and precision of test methods.
