May 2016
(Note: all the previous SPC Knowledge Base in the measurement systems analysis category are listed on the right-hand side. Select this link for information on the SPC for Excel software.)
Specifications. Is your product in spec? Is your product out of spec? And how do you know?
Customers have specifications and they want product that meets their specifications. Of course, you sample and test the product to ensure it meets those customer specifications. This is one way measurement systems are used – to determine if the product is within specifications.
Suppose one customer’s specification range for your product is 95 to 105. Recent test results have been great: 98.7, 102.4, 100.3, 99.7. Everything is meeting specifications. Now, you get a result of 95. Right on the lower specification limit. What do you do? Accept the sample result as being within specification? Well, it does meet the specification limit. Why not accept it? A little worried about doing that perhaps? So you retest the sample. The sample result comes back 95.7. Definitely, within specifications!
Many organizations do this – compare the test result directly to the customer specifications. The problem is that this approach does not take into account the uncertainty associated with the test method. This month’s publication takes a look at a method for creating manufacturing specifications by adjusting customer specifications to account for the measurement uncertainty – so that when the product is within these manufacturing specifications you can be “sure” that it is within the customer’s specification. Thanks to variation, there is a probability associated with the “sure.”
In this issue:
- Specifications and Measurement
- Setting Manufacturing Specifications Process
- Impact on Internal Process Capability
- Workbook to Determine Manufacturing Specifications
- Summary
- Quick Links
We also created a workbook that you can download for determining manufacturing specifications using the process laid out in this publication. Please feel free to leave a comment at the end of this publication. You can download a pdf file of this publication from our e-reader at this link.
Specifications and Measurement
The website businessdictionary.com has the following definition for a specification:
“Exact statement of the particular needs to be satisfied, or essential characteristics that a customer requires (in a good, material, method, process, service, system, or work) and which a vendor must deliver. Specifications are written usually in a manner that enables both parties (and/or an independent certifier) to measure the degree of conformance.”
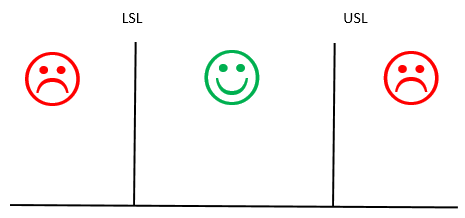
The definition above essentially says that all is going great as long as the product is within specifications. The customer is happy – as are we. Things are not going so great when the product is out of specifications – the customer is not happy, nor are we. This is shown in Figure 1, where LSL = lower specification limit and USL = upper specification limit.
Figure 1: The Specification View of the World
Take a look back at the definition of specifications. See the part about “to measure”? We have to be able to measure whether or not the product (or whatever is being provided) meets the specifications. Specifications are set – for example, 95 to 105. Hard numbers. And, far too often, we assume that the test result we receive is a hard number also – the true value. So, we make direct comparisons between the test result and the specifications.
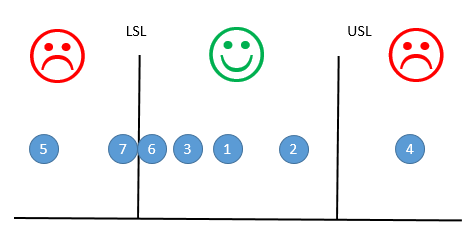
Take a look at Figure 2. The circles with numbers represent test results from our process. Let’s see how we respond for each result.
Figure 2: Specifications and Measurements
- Result 1: Everyone is happy. The test result is well within specifications.
- Result 2: We are still happy. The test result is not centered; it is a little closer to the USL, but it is well within specifications.
- Result 3: We are still happy. Again, the test result is not centered; it is a little closer to the LSL, but within those specifications.
- Result 4: We are not happy. The result is above the USL. We have to do something – either rework or scrap.
- Result 5: We are not happy again. This time the result is below the lower specification limit. Rework or scrap again most likely
- Result 6: We are happy. Maybe a little nervous though. But the result is within specifications. It is close, but it is within specifications.
- Result 7: We are not happy. The test result is just below the LSL. But maybe there is hope. Retest the sample to see if it comes back within specifications! Or ship it anyway because we know the customer will take it.

What is really needed is a set of manufacturing specifications that take into account measurement variation – the fact that you don’t get the same result each time you test the same part. Dr. Donald Wheeler outlines a method of adjusting the customer specifications to account for this measurement uncertainty in this book: EMP III Evaluating the Measurement Process & Using Imperfect Data, www.spcpress.com. This methodology is described below.
Setting Manufacturing Specifications Process
You have your customer specifications. You want to be sure that everything you ship to the customer is within those specifications. To do that, you have to take into account measurement error. The measurement error is used to create manufacturing specifications. These manufacturing specifications are, of course, tighter than the customer specifications. The tighter the manufacturing specifications, the more likely you are to be in conformance with the customer specifications. The process for determining manufacturing specifications is given in the steps below.
- Determine the measurement system error
- Determine your measurement increment (resolution)
- Determine the Watershed Specification Limits
- Determine the manufacturing specifications based on the probability you can live with
Each step is described below.
Determine Measurement System Error

PE = 0.675σms
where σms is the precision of the test method. If you continually re-measure the same part, half of the repeated measurements should fall between the average and ± one PE.
Last month’s publication described how to determine the Probable Error for a measurement system. The example below demonstrates how to find the PE.
Based on the equation above, we need to find σms to find the Probable Error. This is easily found by using repeated measurements of the same sample – and using a moving range chart. Suppose one operator measures the same sample 20 times. The results are given in Table 1 along with the moving range (mR) values.
Table 1: Repeated Measurements of Same Sample
| Retest Number | Result | mR | Retest Number | Result | mR | |
| 1 | 99.8 | 11 | 100.0 | 0.1 | ||
| 2 | 100.1 | 0.3 | 12 | 99.2 | 0.8 | |
| 3 | 100.2 | 0.1 | 13 | 100.1 | 0.9 | |
| 4 | 100.0 | 0.2 | 14 | 100.3 | 0.2 | |
| 5 | 99.9 | 0.1 | 15 | 99.8 | 0.5 | |
| 6 | 99.9 | 0.0 | 16 | 100.2 | 0.4 | |
| 7 | 100.3 | 0.4 | 17 | 100.1 | 0.1 | |
| 8 | 99.0 | 1.3 | 18 | 99.9 | 0.2 | |
| 9 | 99.8 | 0.8 | 19 | 99.9 | 0.0 | |
| 10 | 99.9 | 0.1 | 20 | 99.8 | 0.1 |
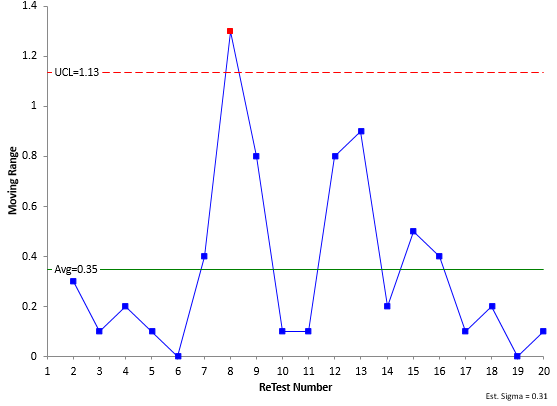
The results in Table 1 were analyzed using a moving range chart as shown below.
Figure 3: Moving Range Chart for Repeated Measurements of the Same Sample
The moving range chart plots the moving range between consecutive points. There are two purposes to this control chart. One is to determine if the moving range between consecutive points is consistent over time. As long as there are no out of control points, this moving range is consistent (in statistical control). This is true for the chart in Figure 3. If you would like more information on how the moving range is constructed, please see our individuals control chart publication.

σms=R/1.128
The average range from Figure 3 is 0.35, so σms is given by:
σms=R/1.128 =0.35/1.128=0.31
The Probable Error is then given by
PE = 0.675σms = 0.675(0.31) = 0.21
Thus, 50% of the retested results will lie within ± 1 PE of the part’s average.
Determine the Measurement Increment
The measurement increment is simply the measurement resolution. What are you measuring the results to? In Table 1, the measurements are to 0.1. This is the measurement increment. Last month’s publication used the PE to determine if your measurement increment is satisfactory. For our purposes here, we will assume that the measurement increment is satisfactory.
Determine the Watershed Specification Limits
Suppose your customer specifications for your process are LSL = 95 to USL = 105. Your measurement increment is 0.1 as shown in Table 1. A test result of 95 is in spec, but a test result of 94.9 is not in spec. The Lower Watershed Specification Limit (LWSL) is defined as being halfway between the LSL and one measurement increment below LSL:
LWSL = LSL – Measurement Increment/2 = 95 – 0.1/2 = 94.95.
The Upper Watershed Specification Limit (UWSL) is defined similarly:
UWSL = USL + Measurement Increment/2 = 105 + 0.1/2 = 105.05
These Watershed Specifications are essentially adjusting the customer specifications to account for the measurement increment of our test method. We will use the Watershed Specification Limits to set the manufacturing specifications.
Determine the Manufacturing Specifications

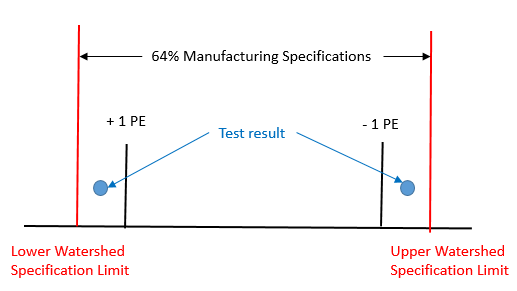
Suppose we decide to set our manufacturing specifications equal to the Watershed Specification Limits. Now, suppose that a test result falls within one PE of the Watershed Specification Limits as shown in Figure 4.
Figure 4: 64% Manufacturing Specifications
Dr. Wheeler shows in his book that there is at least a 64% chance that the part is within specifications. Dr. Wheeler phrases it this way: “If you use your Watershed Specification Limits as your Manufacturing Specifications, you will have at least a 64% chance that the measured item is in spec when the measurement falls within the Manufacturing Specifications.
In our example with customer specifications of 95 to 105 and a probable error of 0.21, the 64% manufacturing specifications are given by the Watershed Specification Limits of 94.95 to 105.05. If a test result is within these values, you have at least a 64% of the part meeting the specifications.
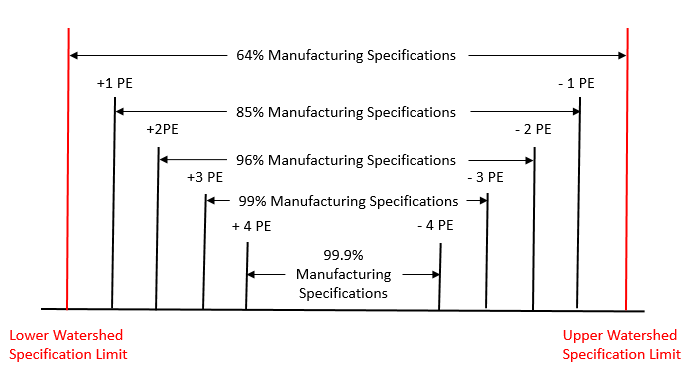
To increase this % chance of meeting specifications, we have to tighten the manufacturing specifications further. We can do this in multiples of the Probable Error. We can decide to tighten the specifications by one PE on each side. This generates 85% manufacturing specifications. Table 2 shows how to set the manufacturing specifications to obtain up to 99.9% manufacturing specifications.
Table 2: Manufacturing Specifications
| % Manufacturing Specifications | Lower Manufacturing Specification | Upper Manufacturing Specification |
| 64% | LWSL | UWSL |
| 85% | LWSL + 1(PE) | UWSL – 1(PE) |
| 96% | LWSL + 2(PE) | UWSL – 2(PE) |
| 99% | LWSL + 3(PE) | UWSL – 3(PE) |
| 99.9% | LWSL + 4(PE) | UWSL – 4(PE) |
Figure 5 shows the relationship between these manufacturing specs, the Watershed Specification Limits and the Probable Error.
Figure 5: Manufacturing Specifications
Of course, tightening manufacturing specifications involve a trade-off between “being sure” that you are meeting customer specifications and making more “off spec” product. You will have to decide where this trade-off makes sense for you.
Impact on Internal Process Capability
Your process capability is based on your customer specifications. But, if you decide to use manufacturing specifications – which are tighter than your customer specifications – you may want to track your internal process capability.
Let’s stay with example where our customer specifications are LSL = 95 and USL = 105. Suppose we know that our process average is 100.5 and our process sigma is 2.0. We can calculate the process capability as following:
Cpk = Minimum (Cpu, Cpl)
Cpu = (USL-X)/3σ =(105-100.5)/(3(2))=0.75
Cpu = (X-LSL)3σ = (100.5-95)/(3(2))=0.92
where
- Cpu is the process capability based on the lower specification
- Cpl is the process capability based on the upper specification
- X is the overall process average
- σ is the process sigma

% above USL: 1.22%
% below LSL: 0.30%
The total out of spec is 1.52%. Now suppose we decide to tighten our internal specifications so that we have 96% manufacturing specifications. From Table 2, the manufacturing specifications are given by:
Lower Manufacturing Specification (LMSL) = LWSL + 2(PE) = 95.95 + 2(0.21) = 95.37
Upper Manufacturing Specification (UMSL) = UWSL – 2(PE) = 105.05 – 2(0.21) = 104.63
You can now calculate the internal process capability as follows:
Cpu = (UMSL-X)/3σ =(104.63-100.5)/(3(2))=0.6
Cpu = (X-LMSL)3σ = (100.5-95.37)/(3(2))=0.85
Now you calculate the % out of spec for the manufacturing specifications.
% above USL: 1.95%
% below LSL: 0.52%
The total out of spec is now 2.47%. So, tightening to 96% manufacturing specification limits increased the out of spec from 1.52% to 2.47%.
Please note that is just one example. What happens in your process depends on the process average and sigma, the measurement increment, and the Probable Error. It may that you don’t increase out of specification material that much or you may increase it a lot more. You have to do the calculations to determine the impact.
Workbook to Determine Manufacturing Specifications
We have created an Excel workbook to help you perform these calculations. You can download it at this link. The workbook requires you to enter the following information:
- LSL
- Nominal
- USL
- Process Sigma
- Process Average
- Measurement Increment
- Measurement System Standard Deviation
It will then calculate the various manufacturing specifications and determine the impact on process capability and % out of spec.
Using the values in this publication, the workbook creates the following tables:
Table 3: Workbook Output for Manufacturing Specifications
| % Manufacturing Spec. | LMSL | UMSL |
| 85% | 95.16 | 104.84 |
| 96% | 95.37 | 104.63 |
| 99% | 95.58 | 104.42 |
| 99.9% | 95.79 | 104.21 |
Table 4: Workbook Output for Impact on Process Capability
| Specification | Cpl | Cpu | % Out |
| Customer | 0.92 | 0.75 | 1.52% |
| 85% | 0.89 | 0.72 | 1.88% |
| 96% | 0.86 | 0.69 | 2.46% |
| 99% | 0.82 | 0.65 | 3.19% |
| 99.9% | 0.79 | 0.62 | 4.09% |
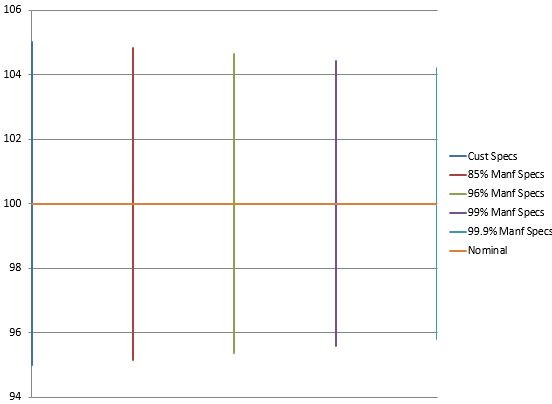
Table 3 lists the various options for the manufacturing specifications. Table 4 shows the impact on process capability and % out of specifications. The workbook also generates a figure that shows how the spec limits change, as shown in Figure 6.
Figure 6: Changing Specifications
We hope you find the workbook useful.
Summary


Hi, BillThank you once again for generously providing this very valuable objective viewpoint. I know that it is valuable because I work in the US pharma sector and I know that it is quite averse to this sort of analysis. Also, I see daily examples of the tremendous waste caused when subjective methods are used in it's place. In pharma, measurement capability and uncertainty analysis is reserved strictly for the metrology associated with maintaining calibration standards. Many years ago, the Barr Decision pointed out the pitfalls that follow along behind attempts to re-measure a "near OOT" quanitity in the hopes that subsequent values will be in tolerance. Your examples point out exactly the dangers in doing this wihout a comprensive plan or the kind of understanding that could easily result from reading and understanding these excellent articles.Thanks again, this is really good stuff!Stephen Puryear
Dear Bill,We are unable to download the article in pdf reader format as per your addressed link. Kindly assist.Thank you.Rgds, Choi
When the reader comes up, there are a list of symbols on the left-hand side. The fourth one down has "PDF". Select that option. Then select "Pages" so all pages will be downloaded as pdf. Then select Save. e-mail if you still have problems (bill@www.spcforexcel.com)
Hey Bill,Thx for great material. Can you double check comment under (for) figure 3, in particular:”As long as there are no out of control points, this moving range is consistent (in statistical control). This is true for the chart in Figure 3″We have one point out of the limit, retest item 8, mR value 1.3, which means, measurement system is not stable.
Yes you are correct. There is one out of control point in the chart. The comment is not correct. However, it does not make a big difference in the calculations.
Hello Bill
Shouldn’t the accuracy (non-linearities, calibration uncertainty,…) be taken into account in calculating the PE? It seems important to do so when determining the manufacturing specifications (if not, your estimation of how certain you are a measurement will be in spec or not, will not be correct).
I would calculate it like this (see image attached).
What do you think?
Are not those uncertainities included in rerunning the same sample over and over?
Not necessarily. The measurement instrument can/will have a certain deviation from the “true” value (that is the calibration reference), such as an (relative/absolute) offset or non-linear behaviour between the calibration points.
The part of this deviation that behaves “repeatable” will never be visible during repeatability tests.
Good point. I have not seen it calucated like you suggest, but don’t see why it is not valid to do that way.
Ok thanks!