November 2019
(Note: all the previous SPC Knowledge Base in the measurement systems analysis category are listed on the right-hand side. Select this link for information on the SPC for Excel software.)

So, you perform Gage R&R studies. You have multiple operators test multiple parts multiple times. Then you put the results into your software and generate your Gage R&R report. It presents a number for % Gage R&R (% GRR). You go straight to the part that tells you how “good” your measurement system is based on % GRR, hoping it is acceptable. You will get an answer about how good your measurement system is.
But how “good” is that answer? If you made one of the mistakes covered below, you may well be misled about how good you think your measurement system is. This publication looks at five common mistakes that are made when performing Gage R&R studies.
In this issue:
- Gage R&R Methodologies
- Gage R&R Data
- Five Common Mistakes in Gage R&R Studies
- Not Checking the Data for Consistency
- Not Using Historical Data for the Process Standard Deviation
- Not Looking for Differences Between Operators
- Using Arbitrary Guidelines for Deciding if a Measurement System is Good
- Not Using EMP Techniques to Perform Gage Studies
- Summary
- Quick Links
You can download a copy of this publication at this link. Please feel free to leave a comment at the end of the publication.
Gage R&R Methodologies
There are several ways to analyze a Gage R&R study. The three most commonly used are:
- Average and Range Method
- ANOVA Method
- EMP (Evaluating the Measurement Process) Method
The Average and Range method has been around the longest, followed by the ANOVA method. EMP, developed by Dr. Donald Wheeler, is the most recent. Some of the common mistakes below are independent of the methodology being used. Others are due to the methodology selected for the Gage R&R study.
Each of these methodologies have been covered in detail in our SPC Knowledge Base. An overview of the three are given in our publication Three Methods to Analyze Gage R&R Studies if you need more information.
Gage R&R Data
The basic set of data we will refer to in this publication are shown in Table 1. This Gage R&R study has three operators, measuring five parts, two times.
Table 1: Gage R&R Results
| Operator | Part | Result 1 | Result 2 |
|---|---|---|---|
| A | 1 | 67 | 62 |
| A | 2 | 110 | 113 |
| A | 3 | 87 | 83 |
| A | 4 | 89 | 96 |
| A | 5 | 56 | 47 |
| B | 1 | 55 | 57 |
| B | 2 | 106 | 99 |
| B | 3 | 82 | 79 |
| B | 4 | 84 | 78 |
| B | 5 | 43 | 42 |
| C | 1 | 52 | 55 |
| C | 2 | 106 | 103 |
| C | 3 | 80 | 81 |
| C | 4 | 80 | 82 |
| C | 5 | 46 | 54 |
We will use these data to demonstrate some of the mistakes made in performing Gage R&R studies.
Five Common Mistakes in Gage R&R Studies
There are some common mistakes that I have seen in conducting Gage R&R studies. The five that are covered here are:
- Not Checking the Data for Consistency
- Not Using Historical Data for the Process Standard Deviation
- Not Looking for Differences Between Operators
- Using Arbitrary Guidelines for Deciding if a Measurement System is Good
- Not Using EMP Techniques to Perform Gage Studies
There are other mistakes that are made as well, including not randomizing the runs and not ensuring the operators do not know what results they previously obtained. For this publication, we will stay with the five given above.
Not Checking the Data for Consistency
It is very important to check the results of a Gage R&R study for consistency. This means checking to see if the operators are consistent in the way they run the test. If the operators are not consistent, then the results will be suspect.
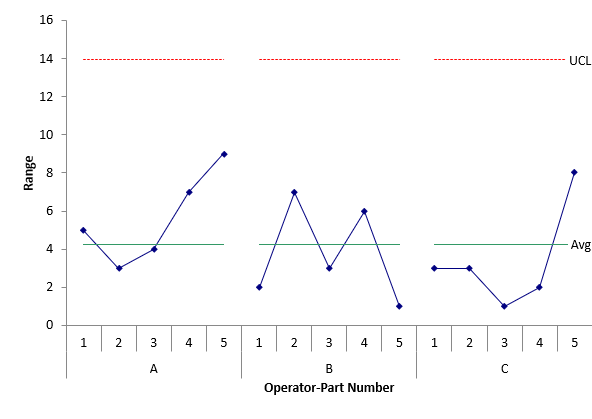
You check consistency by looking at the range control chart for the operators by part. The range chart for the data in Table 1 is shown in Figure 1.
Figure 1: Operator-Part Range Chart
The range chart plots the range between the 2 results for each operator-part combination. The overall average and upper control limit are calculated and added to the control chart. There are no points beyond the upper control limit in Figure 1. This means that the operators can repeat the measurements consistently. The rest of the Gage R&R analysis can continue. If you want more information on this, please see our SPC Knowledge Base publication: Evaluating the Measurement Process – Part 2. This publication contains the data and charts shown here with more explanation.
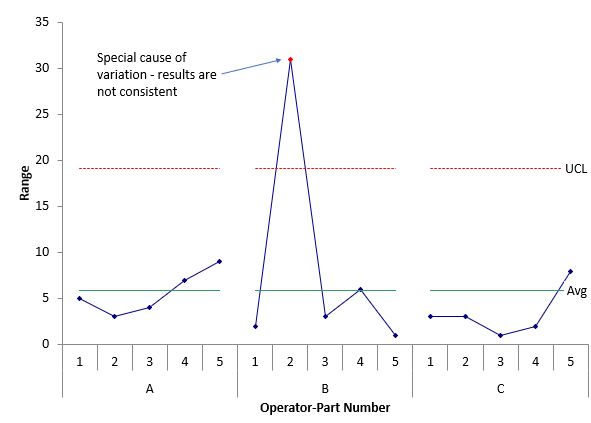
Now, suppose only one number is changed. Suppose Operator B, for Part 2 has a 75 for the second result instead of a 99. What happens to the results? Figure 2 shows the range control chart with the changed data point.
Figure 2: Operator-Part Range Chart Containing Out of Control Point
The changed data point is now out of statistical control. There was a special cause of variation for Operator B and Part 2. The range for that result is beyond the UCL. This means that the operators were not consistent. The reason for the special cause should be found and eliminated. The Gage R&R testing should be repeated – or, at a minimum, rerun Part 2 with Operator B.
The mistake is that people sometimes don’t look at the range control chart – or don’t know what they are looking at. When the data are not consistent, you can’t be sure of getting a similar result later. And if you ignore the inconsistency, your Gage R&R results will look worse. The % of total variance due to the measurement system (% GRR) is 5.68% for the in-control range chart and 12.40% for the out-of-control range chart using the ANOVA method to analyze the results.
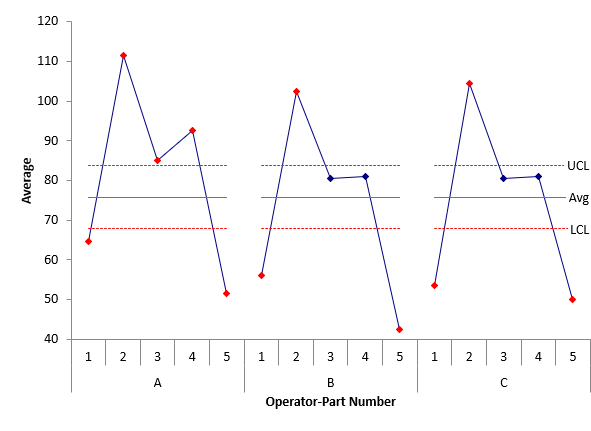
While you don’t want out of control points on the range control chart, you do want out of control points on the X control chart. Since the average range is used in the X control limits and since the average range is based on the measurement system variation, you would expect the control limits to be tight if the measurement system can detect the difference between samples. Figure 3 shows the X chart for the data in Table 1.
Figure 3: Operator-Part X Control Chart
Each point plotted is the average for the results for an operator and a part. There are lots of points that are out of control. This gives you a visual picture that the measurement system can tell the difference between parts.
Not Using Historical Data for the Process Standard Deviation
This is a common mistake. Ideally, you would like the parts used in a Gage R&R study to be representative of the production process. This means that the range of the parts in the study should reflect the range of production.
To determine the % of the variance due to the measurement system, you need to use the following equation:
σx2= σp2+σe2
where σx2= total variance of the product measurements, σp2= the variance of the product, and σe2= the variance of the measurement system. The % variance due to the measurement system is then given by:
% Variance due to Measurement System= 100(σe2/σx2)
To calculate this, you need an estimate of σx2. There are two ways to do this. One way is to use the parts in the study to estimate the total variation. The other is to use an historical process standard deviation (σx)
The preferred method is to use historical data. For example, if you make the part frequently, you can take one month’s data and make a control chart using that data. Then estimate the historical process standard deviation from the range chart. If you want, you can remove any out of control points before estimating the historical process standard deviation. If you have enough historical data (e.g. 200 points), then you probably don’t need to remove the out of control points. Unless there are a lot of out of control points, they won’t have much impact on the historical process standard deviation estimated from the range chart. So, using this approach reduces the impact of those out of control (and perhaps out of specifications) parts and gives you a better estimate of the process variation than the parts used in the study.
Using the historical process standard deviation does take away the trick of adding out of specification parts into the study to help increase the total variance in the study and improve the Gage R&R results.
Not Looking for Differences Between Operators
We tend to be happy if the measurement system is “good enough” based on the Gage R&R results and don’t look for additional opportunities to improve the measurement system. Sometimes if the results are not good enough, we don’t know where to begin to look.
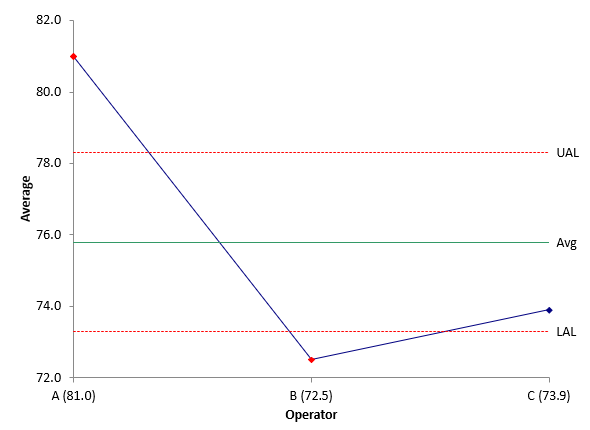
The first place to begin is to see if there are differences between the operators in terms of repeatability or bias. The easiest and quickest way to determine possible differences is by using the Main Effects Chart (ANOME) and the Mean Range Chart (ANOMR). The ANOME chart compares the operators’ averages, while the ANOMR chart compares the operator’s average ranges. Both charts are used in the EMP methodology. The chart below shows the ANOME chart for the data in Table 1.
Figure 4: ANOME Chart
The UAL and LAL are upper and lower ANOM limits – not calculated like control charts – but similar. The interpretation is the same. Any points beyond the ANOM limits are significantly different from the average.
Both Operators A and B have averages beyond the ANOM limits. However, looking at the chart in Figure 4, Operator A appears to be significantly different, with Operators B and C getting similar results. This analysis points you in the right direction to further improve the measurement system. Why are Operator A’s results so different? Correct that issue and your Gage R&R improves. We will not show the ANOMR chart here.
Using Arbitrary Guidelines for Deciding if a Measurement System is Good
The question you want to answer, of course, in doing a Gage R&R study is simply “is my measurement system good enough?”. Most people use the guidelines created by AIAG (Automotive Industry Action Group):
Table 2: AIAG Guidelines
| AVERAGE AND RANGE METHOD | ANOVA METHOD | ACCEPTANCE |
|---|---|---|
| Under 10% | Under 1% | Generally considered to be an adequate measurement system |
| 10 % to 30% | 1% to 9% | May be acceptable for some applications |
| Over 30% | Over 9% | Considered to be unacceptable |
There is plenty that is wrong with these guidelines. To start, the Average and Range method is not based on % of variance due to the measurement system. It is based on what they call % of the Total Variation (not variance!), which is based on the ratio of the measurement system standard deviation to the total standard deviation. One problem is that percentages based on standard deviations do not sum to 100 as will percentages based on the variances.
To create guidelines based on the variance (using the ANOVA method), they simply squared each guideline for the % of total variation.
I have yet to see any good reasoning behind these guidelines. Need proof of this? Look again at the first column in the above table. Those guidelines are based on the % of total variation. However, AIAG uses the exact same guidelines when using the % of specifications to determine how “good” a measurement system is. The exact same guidelines for two totally different things?
Put simply, the guidelines in Table 2 should not be used. I imagine the cost has been huge over the years as suppliers respond to customer’s demands to improve a measurement system that is not acceptable under these guidelines.
Dr. Wheeler, in his EMP methodology, has developed guidelines based on how the measurement system impacts the process. His guidelines are shown in the table below.
Table 3: The Four Classes of Process Monitors
| INTRACLASS COEFFICIENT | TYPE OF MONITOR | REDUCTION OF PROCESS SIGNAL | CHANCE OF DETECTING ± 3 STD. ERROR SHIFT | ABILITY TO TRACK PROCESS IMPROVEMENTS |
|---|---|---|---|---|
| 0.8 to 1.0 | First Class | Less than 10% | More than 99% with Rule 1 | Up to Cp80 |
| 0.5 to 0.8 | Second Class | From 10% to 30% | More than 88% with Rule 1 | Up to Cp50 |
| 0.2 to 0.5 | Third Class | From 30% to 55% | More than 91% with Rules 1, 2, 3 and 4 | Up to Cp20 |
| 0.0 to 0.2 | Fourth Class | More than 55% | Rapidly Vanishing | Unable to Track |
These guidelines put the measurement system into one of four classes depending on the value of ρ, which is the Intraclass Correlation Coefficient and is calculated as:
ρ= σp2/σx2
This is simply the % of the total variance that is due to product variance. Remembering the basic equation above, then 1 – ρ is the % of the total variance that is due to the measurement system:
1 – ρ = 1 – σp2/σx2= (σx2– σp2)/σx2= σe2/σx2
1 – ρ is the %GRR. Dr. Wheeler developed these guidelines by considering how much the measurement system reduces a signal (out of control point), the probability that the measurement system can detect a major shift in the process, and the ability of the measurement to track future improvements. There is logic applied to the classes of measurements – unlike the guidelines set by the AIAG.
The EMP guidelines are the ones you should use. Please see our SPC Knowledge Base publication, Acceptance Criteria for Measurement Systems Analysis (MSA), for more information on this topic.
Not Using Evaluating the Measurement Process Techniques to Perform Gage Studies
Dr. Wheeler’s EMP methodology has been mentioned several times in this article. This methodology provides the most information about your measurement system. In EMP terminology, a Gage R&R study is called the Basic EMP Study. The Basic EMP study should become the methodology used for analyzing Gage R&R studies. It provides much more information than the Average and Range method or the ANOVA method.
The Average and Range method should never be used. It is outdated with its continued emphasis on using the % of total variation (using the standard deviations for ratios) instead of using the % of total variance (using the variance). The ANOVA method is much better than the Average and Range method, although it does give the results in most software packages in both ways (% of total variation and % of total variance). So, in a way, it continues to promote the use of the % of total variation. And the ANOVA method does not provide all the information that can be obtained from the Basic EMP Study.
The information you can get from the EMP Study includes:
- Analyze the results by using an X-R control chart
- Determine if the range chart is consistent
- Determine if there are differences in the operator averages using the Analysis of Main Effects
- Determine if there are differences in the average moving range for each operator by using the Analysis of Mean Ranges
- Estimate the measurement system error
- Determine product and total variances (using parts in the study or historical process sigma)
- Classify the measurement system as a First Class, Second Class, Third Class or Fourth Calls monitor
- Determine if there is enough data
- Determine the effective resolution of the measurement system
- Determine if the measurement increment is adequate
- Determine internal manufacturing specifications based on the probable error
- Determine the precision to tolerance ratio
Please see our publication, Evaluating the Measurement Process (EMP) Overview, for more information on the EMP methodology.
Summary
This publication examined 5 common mistakes when performing Gage R&R studies. These are:
- Not Checking the Data for Consistency
- Not Using Historical Data for the Process Standard Deviation
- Not Looking for Differences Between Operators
- Using Arbitrary Guidelines for Deciding if a Measurement System is Good
- Not Using EMP Techniques to Perform Gage Studies
Each mistake was discussed along with what should be done to prevent that mistake in the future.


Figure 4 expalnation is directing to Figure 5. Is this a typo?
Yes it is a type and has been corrected. Thanks!
How to check if the data is being manufactured? I mean, the result is too good to be true.
There is no set way I don't think – one thing that people sometimes do is to include a part that is way out of specs in the analysis – this makes the results look better than they many actually be.
If the answer of our Gage R&R was 0.02 and it of course acceptable. We produce 3000 pieces in a day .Does it mean that it's ok to have 60 pieces of not ok products???Can you help.Thanks
That is not what 0.02 GAge R&R means. If it is based on variance, it means that 2% of the total variance in product measurements are due to the measurement s ystem.
Should I use the same dimension for allt the samples? Or is it ok to use different dimensions and pieces for each 30 samples?Say I use gage blocks from 5mm, 6mm, 7mm up to 30 pieces?
What do you want to show? I wold probably use the same dimension each time.
I find the article very helpful. I am just trying to find my way in the GRR ‘jungle’. Now I have a question that I have not seen addressed anywhere. What is the appropriate type, or is there a specific type of GRR study for a case whereby one operator cannot measure the same piece more than once (because it cannot be ensured that the operator cannot identify the piece), but different operators can measure the same piece (once)? So, for example, 5 operators measure 5 pieces once only, 25 measurements in total. Thank you.
Hello Peter, I have not run across the situation you describe. I am not sure where this would occur.